Another fun Doodlebug 6×6 paper pad has been used up completely. This time I used Doodlebug’s Lovebirds and made 27 Love cards for Operation Write Home. These were so fun to make, especially with all the pretty pink papers.
Thanks to a little convincing from my friend, Sandy, I videoed my process of using up a 6×6 paper pad. HERE‘s a link to my tutorial. The video was done in super speed, but still ended up being 30 minutes. (It takes awhile to finish up a 6×6.) But, it’s definitely kinda fun to watch. And a big thank you to Sandy for all her work editing this video. Watch the video below or go HERE to watch it on YouTube.
Here’s the big group shot of all 27 cards. Individual pictures are also included with a list of all the products used for each card.

![]()
sketch – My Favorite Things sketch #193, circle die cuts – Spellbinders, heart die cuts – American Crafts, stamp – Hero Arts, pearl pen – Viva Decor, ink – Versafine

sketch – My Favorite Things sketch #193, circle die cuts – Spellbinders, heart die cuts – American Crafts, stamp – Hero Arts, pearl pen – Viva Decor, ink – Versafine

sketch – OWH sketch #239, border die cut – Lawn Fawn, heart die cuts – Lil Inker Designs, oval die cuts – Spellbinders, stamp – Hero Arts, pearl pen – Viva Decor, ink – Versafine

sketch – OWH sketch #239, border die cut – Lawn Fawn, heart die cuts – Lil Inker Designs, oval die cuts – Spellbinders, stamp – Hero Arts, pearl pen – Viva Decor, ink – Versafine

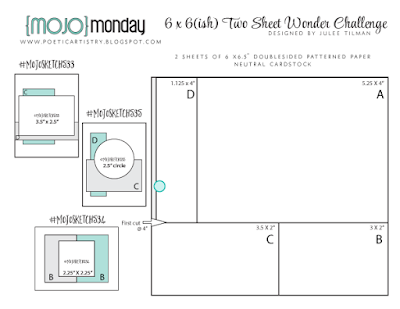
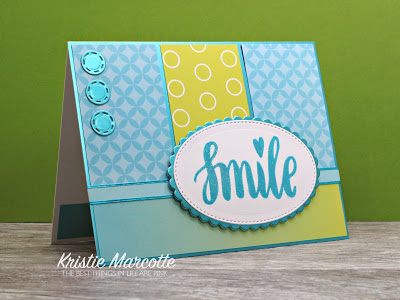
sketch – Mojo Monday sketch #353, embossing folder – Sizzix, stitched square die cut – Lil Inker Designs, border die cut – Lawn Fawn, stamp – The Stamps of Life, heart die cut – American Crafts, Glossy Accents, ink – Versafine

sketch – Mojo Monday sketch #353, embossing folder – Sizzix, stitched square die cut – Lil Inker Designs, border die cut – Lawn Fawn, stamp – The Stamps of Life, heart die cut – American Crafts, Glossy Accents, ink – Versafine

sketch – the Deconstructed sketch #111, circle/scallop die cuts – Spellbinders, button die cut – Memory Box, heart die cut – American Crafts, stamp – Hero Arts, twine – unknown, ink – Versafine

sketch – the Deconstructed sketch #111, circle/scallop die cuts – Spellbinders, button die cut – Memory Box, heart die cut – American Crafts, stamp – Hero Arts, twine – unknown, ink – Versafine

sketch – OWH sketch #123, embossing folder – Cuttlebug, stamp – Paper Smooches, heart die cut – Reverse Confetti, brads – Recollections, ink – Versafine

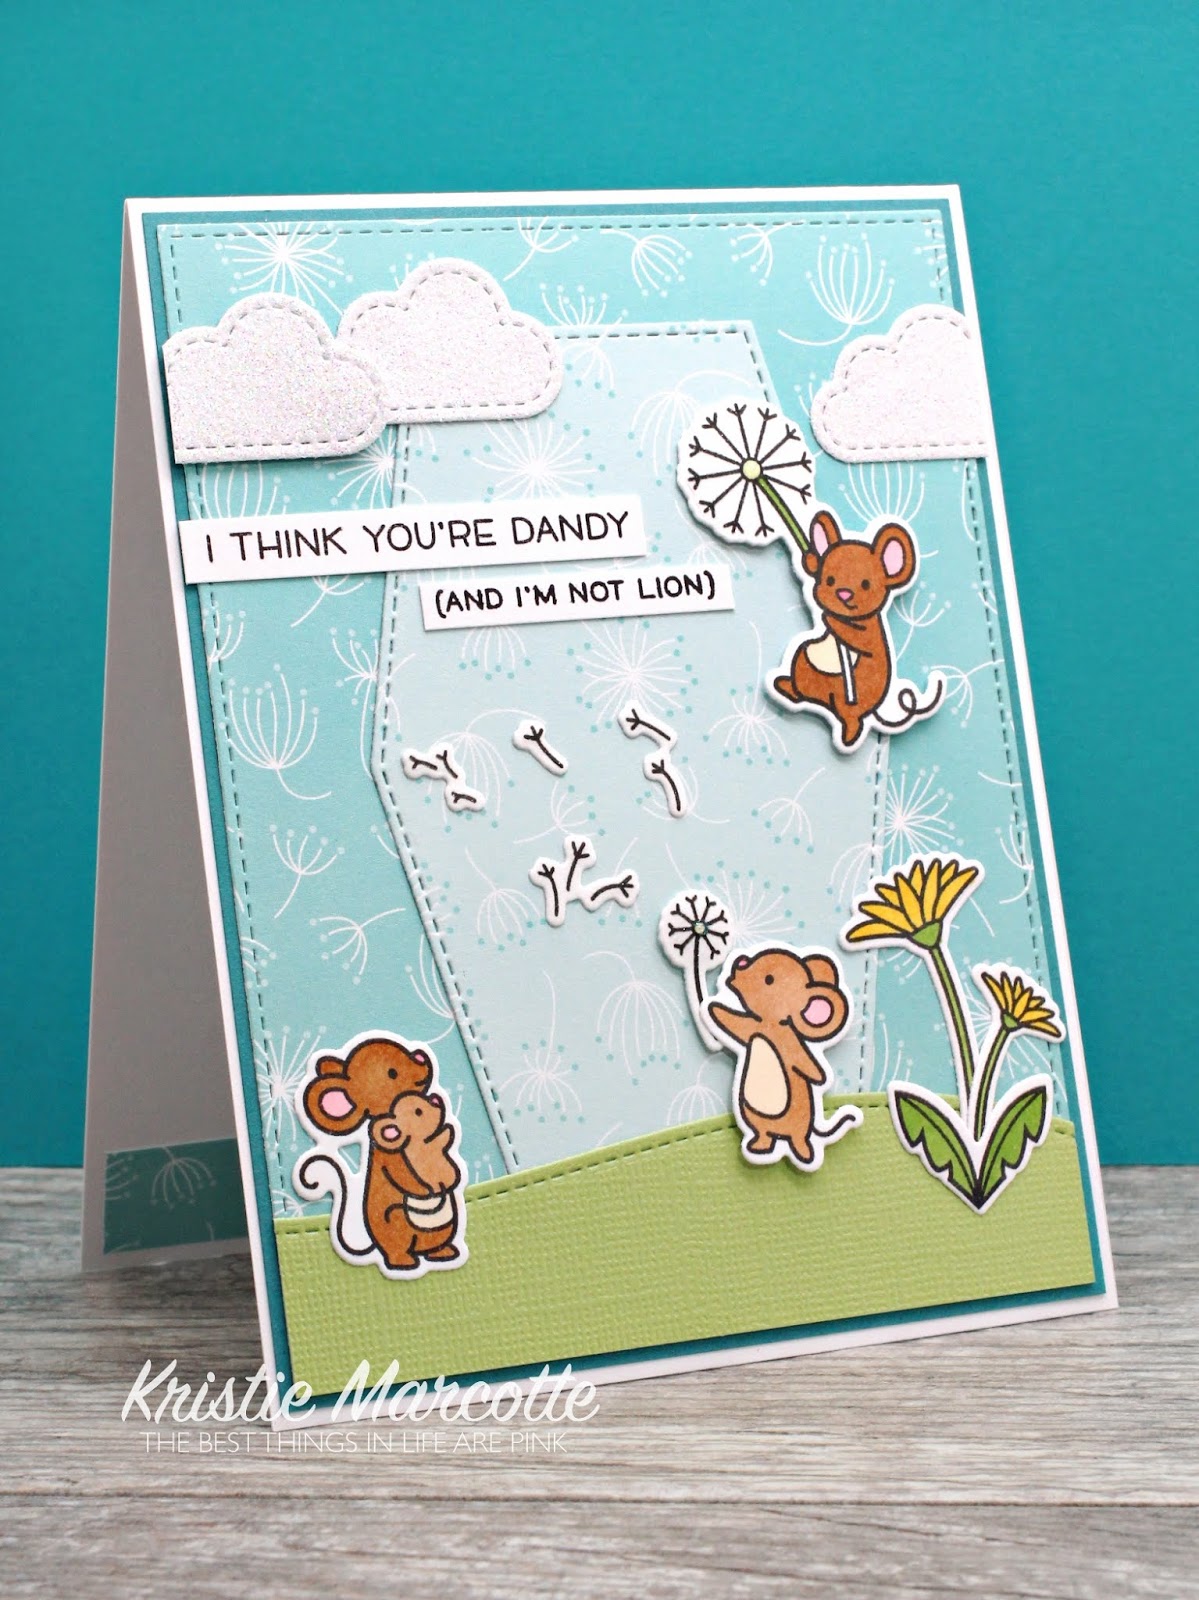
sketch – Reverse Confetti sketch #15, embossing folder – Darice, deer stamp – Lawn Fawn, sentiment stamp – Hero Arts, stitched square die cut – Lil Inker Designs, border die cut – My Favorite Things, ink – Versafine, Copic marker.

sketch – Reverse Confetti sketch #10, embossing folder – Cuttlebug, donut die cuts – Lil Inker Designs, stamp – Lil Inker Designs, twine – The Twinery, brads – Recollections, pearl pen – Viva Decor, ink – Versafine

sketch – OWH sketch #154, embossing folder – Sizzix, circle/scalloped circle die cuts – Spellbinders, border die cut – Lawn Fawn, stamp – Simon Says Stamp, ink – Versafine

sketch – OWH sketch #154, embossing folder – Sizzix, circle/scalloped circle die cuts – Spellbinders, border die cut – Lawn Fawn, stamp – Simon Says Stamp, ink – Versafine

sketch – OWH sketch #154, embossing folder – Sizzix, circle/scalloped circle die cuts – Spellbinders, border die cut – Lawn Fawn, stamp – Simon Says Stamp, ink – Versafine

sketch – OWH sketch #154, embossing folder – Sizzix, circle/scalloped circle die cuts – Spellbinders, border die cut – Lawn Fawn, stamp – Simon Says Stamp, ink – Versafine

sketch – Mojo Monday sketch #238, circle/scallop die cut – Spellbinders, stamp – Hero Arts, twine – The Twinery, ink – Versafine
Some of my favorite and commonly used crafting tools:
Tonic Studios guillotine paper trimmer
Scotch ATG (Advanced Tape Glider) glue gun
ATG tape refills from Tapejungle.com
Sizzix BIGkick die cut machine
Scor-Tape
Tombow Xtreme Tabs
We R Memory Keepers brad setter and piercing tool
We R Memory Keepers Crop-a-Dile Corner Chomper
Scotch Mounting Tape 3/4″
Scotch Quick-Dry Adhesive liquid glue
MISTI stamping tool
Accent Opaque Digital 100# cover weight paper for card bases
Thanks for visiting my blog today! I appreciate your kindness and support!
Thanks for visiting my blog today!

These are amazing Kristie and I loved the video. Watching you make these cards using a 6×6 pad was so awesome!! Thanks for doing the video with Sandy's encouraging. Hugs, Brenda
Wow loved watching the whole process. Thank you for letting Sandy nudge you into doing the video!
Watching this was fantastic!
These are so gorgeous and I love the video too!
Your cards are lovely Kristie!
Fantastic! I think I know what I am doing the weekend after Christmas!
WOW! I am humbled. Beautiful…
Awesome job, great cards. Thank you.
The video was awesome!! I would love to hear you narrate while you go. On those sketches that don't have measurements do you just eyeball what sizes to cut? How long did it take in real time to do all the cards? Thanks for all your tutorials!!!!
Love, love, love! I learned soo much by watching! Love and video over and over, Ahhhhh fun, encouraging, motivating, pretty eye candy… Very inspiring ! Thank you Kristie!
LOVED watching the video!! Do you have a certain width that you do your black mats?
You are a card-making powerhouse! Thanks for sharing your time. And for all you do for the servicemen.
Kristie, this is simply amazing! I watched this YouTube video on the OWH site and am so impressed with this and how you used almost every single scrap of paper in that 6×6 pad! Thank you for sharing this with us! I will most certainly be using this for Christmas and Valentines!
What great inspiration to get into my scrap basket and empty it! Thanks for sharing
Wow!! Fabulous to watch & sooo inspiring. Will have to try it now. Thank you so much.
Thanks, Gabby. I'm not sure I would have enough to really talk during the video since I don't do any fancy techniques. I really do just eyeball the measurements on the sketches. And since I print the sketches and keep them in a composition notebook, I write the measurements on the sketch for future reference. I think the video ended up being around 6 hours total. But a bunch of my die cutting time wasn't included during that time.
I generally do an 1/8" or 1/4" matting for my layers depending on the sketch I use.
You totally rock this process! TFS!
Oh my land am I impressed! That is the most amazing thing I've ever seen. I am the type of card maker that never makes the same card twice so I'm pretty blown away. These cards looks so professional and classy. I may have to try this.
Thanks for sharing your process with is. I'm a huge Doodlebug fan and absolutely love your cards. I've started collecting 6×6 pads – inspired by your lovely creations. Thanks so much!!
(Typing this again, computer lost it) Love your video. I hope to try this sometime. 🙂 Question about your card bases. Do you have them cut and folded somewhere or do you do it yourself? If you do it, do you do it as you go, or do you cut and fold them ahead of time? Thanks
Thank you, Trish. I buy a full case of Accent Opaque Digital 100# paper from my local paper shop. I have them cut the entire case of paper in half for my card bases. (It's only $15 to have them cut the whole case, so definitely worth it.) Then I generally fold them as needed. For this video, I did have a stack all ready to go. I have this really awesome paper folding device. I've had it for several years and don't recall where I bought it at the moment. But it was a little pricey and it's huge.
Comp. ate my note- TFS- I always need these tuts bc my stash of DP seems to multiple rapidly!!! I always enjoy these and I need to get busy with them!!
*multiplY, that is, of course 😉
Hi. I saw you as the featured card maker in my email from OWH. I shows you as being in the same town that I live in. How cool. Hopefully you can see my email address and give me a shout if this is truly where you live. 🙂
I too am from Washington state and I guess we are staying here after almost 7 years lol. We bought a house and work in the seafood industry so we are set. Your cards and video are amazing. We live in Westport. WA so enjoy many things coastal. Great cards…Thanks Sandy for her encouragement.
Thank you, Kristie! This video was awesome. I love paper pads, but never know how to use them up. You've inspired me to give this technique a try.
Could you mail me a sample of the Accent Opaque paper? My email is trishcudney @ gmail dot com. Thanks.
wow I really enjoyed your video and watching the creative process "in action". So inspiring. Your blog with all the extra details is so helpful too. thank you!!!
I notice that you frequently cut your white card base; is it standard A2 or do you make it slightly smaller? Thank you Awesome video…
Thank you, Sandy! All of my cards are the standard A2 size. But I always trim the teeny tiny bit off my white card base to match my card front. It would drive me a little crazy otherwise.
Awesome. I am just amazed at your creativity. Thanks for the video and all the sketches. Now i know how to use a 6×6 paper pad.
Beautiful beautiful
Beautiful beautiful
Wow! I love how you made so many cute cards with one pack of designer paper! Which Tonic trimmer are you using? I like that it is compact and can sit next to you. I have the 12×12 and it is really big!
Thank you, Anne! I've had my Tonic for several years now. It's a 6" x 12" size with an attachment to extend it to 12" x 12". I love it! I believe that size was discontinued, but I just recently saw it may be coming back again.
gracias por el tutorial, precioso trabajo
felicitaciones
saludos desde Chile
You did a wonderful job making all those cards with 6×6 paper. I don't know if I missed it or you didn't say..But..how do we cut the paper or that is up to the ones using it? Thank you so much for sharing your idea and making a video.
Thank you, Cheribear. The cutting is completely up to you. I generally follow card sketches when I make cards. Most of the measurements for the sketches I used for this video are included on my Revisited Tutorial blog post. eponinekc.blogspot.com/2014/10/6×6-paper-pad-tutorial-revisited.html
WOW! I am so impressed! What is that glue-kind-of-thing you are using??
Thank you, Naomi! Which glue are you referring to? I used an ATG tape gun for all of my cards. The liquid glue is Scotch Quick-Dry Adhesive. And I also used Glossy Accents to seal the knots on my twine. Thanks so much for watching my tutorial video.
thanks a lot for your answer! I was referring to the ATG-gun. Just ordered one now!
Amazon has a lot of them for sale. I just purchased a 6" Tonic trimmer for 20.44$ and they also have 8 1/2" ones for 24$.
I just found these fabulous YouTube tutorials, and boy am I glad I found them. #Awesome
I'll definitely be making some of these beautiful cards come 2016.
Love the video. Your card making skills are awesome. I really enjoyed the music within the video and at the 6:54 mark there is a song about "Goodbye" that I really would love to purchase but sound hound and shazam were unable to locate it. Care to give credit to the artist that sang the songs in the video?
Thank you! This was the first video I made and I did not do the post production editing on it. The editing was done by Operation Write Home, so I don't actually know the sources of any of the music. The organization used a paid subscription music service and sometimes that music is not available without paying the subscription fee.