For several years, I donated cards to the non-profit organization Operation Write Home. The organization is now closed, but used to provide blank handmade cards to deployed US service members so they would have cards to write home to their family and friends. Sometimes, the organization would need a large quantity of cards, quickly. It was around this time, I started making cards using 6×6 paper pads. I would use a couple of sketches and completely finish the paper pad. I then started sharing the pictures of the cards on the organization’s Facebook page.
This is the very first picture I ever shared of my 6×6 Paper Pad Tutorial. It was in June 2012.

So many people loved the pictures and wanted to know how I did it. Before long, I was asked by Operation Write Home to share my process and write a tutorial for them. So, in August of 2012, my tutorial was published on the Operation Write Home blog. Since the closure of the organization, some of the blog post links no longer work. I still have all of the information, so I decided to share my original tutorial on my own blog. At the time, I was not listing the sketch measurements or products used. Over the years, I now know people enjoy having that information.
Kristie Marcotte’s original 6×6 tutorial
Published August 2012
How to utilize the entire 6×6 paper pad when making cards
I was first introduced to using the mini 6×6 paper pads for card making by friends in my monthly craft group. Now I make most of my cards with the 6×6 pads. I love that the papers all coordinate together and the patterns are a reduced size, which is perfect for card makers. As a card maker, I do have a little quirk or OCD issue, as my hubby lovingly says, in that I HAVE to use up all the patterned paper. I do not like having scraps lying around. The scraps from the 6×6 pads can get quite small. So rather than figure out how to store a partially used paper pad, I decided to just use it all up before moving on to a new one. For me, this works great. Since many people have asked about my card making method, I am here to give one example of how I use the 6×6 pads.

- First I selected Carta Bella Beautiful Moments 6×6 paper pad. I prefer using two sided paper pads incase I don’t like some of the designs. I then gathered together matching cardstock. I’m never sure exactly which colors or how many I will use, so I just make sure to have lots of variety on hand. Then I selected one sketch to start with. I absolutely love sketches and am so grateful for all the talented people who provide those. Sometimes I may use almost the entire pad on one sketch, but usually I just make a few cards then move on to another sketch. In this example, I started with The Deconstructed sketch #46.

2. I made 4 cards using the first sketch. Then, I looked at what papers and sizes were left over and selected to work on OWH sketch #123 next.

3. This time I made 6 cards with the sketch. I again looked over my leftover paper and scraps before choosing OWH sketch #127.

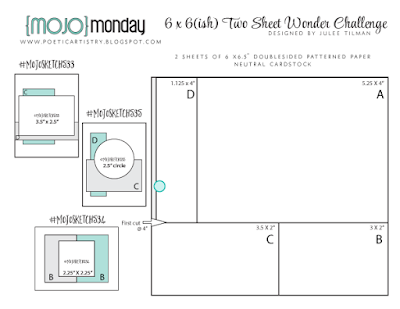
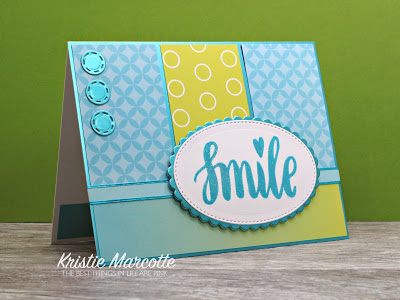
4. I made 7 cards with this sketch. Now, I basically had only scraps left, so I chose Mojo Monday sketch #229, since it would work perfectly with long strips of paper.

5. With the scraps I had left, I made 5 cards with this sketch, leaving small pieces of paper. I selected Mojo Monday sketch # 238 for the last few cards since it used lots of small squares in the sketch.

6. The final card count from this paper pad was 24 cards. I average between 20-30 cards total from one 24-sheet paper pad, depending on which sketches are used.
I hope this card tutorial will be beneficial to many card
makers out there. Now go grab a 6×6 paper pad and get crafty!


![]()


![]()
In October 2014, I revisited my 6×6 Paper Pad Tutorial and provided more information, including measurements for all sketches used. Go HERE to see it.
In December 2014, I recorded my first video version of my 6×6 Paper Pad Tutorial. It was published on Operation Write Home’s YouTube channel. The link is HERE.
The video quickly became popular, so I decided to start my own YouTube channel and published another 6×6 video in June 2015. The link is HERE. I now have several other 6×6 videos, as well.
Thanks for visiting my blog today!

Kristie, I remember when you released your tutorial and how much it helped us OWH volunteers utilized our 6×6 paper pads! You know I've been a fan of your work ever since! Hugs.
Aw, thank you, Sherry! You are so sweet! I miss all the OWH ladies!
Wow–what a blast from the past. I wasn't involved with OWH at that time–but I did catch your first video. I have been following you ever since!
Aw, thank you Jennifer! I learned so much from OWH. I'm so grateful for all the wonderful people who supported the organization.
Helpful post.
Thank you! I'm happy it was helpful for you.
I would love to donate some cards to an organization similar to OWH. Is there one you recommend?
Hello! Now that OWH is closed, I donate all my cards to local organizations. I write uplifting notes inside a lot of them and give them to nursing/retirement homes. There are a couple of small charities nearby that I provide a small box of thank you and general cards every month. I know there are lots of different places in need of handmade cards, but I do not know any directly. I would suggest looking around your own neighbor. Hospitals or nursing homes are a great place to check first.
So glad to come across your post!! Love your cards. And, thanks so much for the card sketches, too!
Aw, thank you Patty! I appreciate you stopping by my blog. I hope you have a wonderful day! 🙂
what is your email address and how do I find you on the internet? I am new to this and I love your site. I'm on the computer at the library and want to find you when I get my own computer. Love what your doing with your cards after you have made them. I dont want to lose you.
Hello. I appreciate your kindness. I am on YouTube as Kristie Marcotte. I am also on social media sites Facebook and Instagram as The Best Things in Life are Pink. You can always send me a message there. 🙂